Unleashing the Power of Proxmox

Introduction:
In the realm of open-source solutions, Proxmox stands out as a versatile platform that empowers users to experiment and harness the full potentail of virtual machines. In this article I am going to provide an overview of the build I am using for a minecraft server, home assistant installation, openvpn server, and specifically the steps required to pass a GPU through to a specific VM.
Passing a GPU to a specific VM allows that individual VM to take advantage of the hardware for video transcoding and similar.
Building My Proxmox Host:
Hardware Components:
The following components were used in my build, please note that the links provided are affiliate links and I would receive a kick-back if you buy anything through the Amazon links.
| Component | Detail | Price | Link |
|---|---|---|---|
| GPU | ASUS Phoenix GeForce GTX 1660 TI 6GB GDDR6 | $284.99 | Amazon |
| CPU | Intel Core i5 9th Gen - Core 15-9400F Coffee Lake 6-Core 2 | $149.99 | Amazon |
| SSD | Seagate BarraCuda 2.5" 500GB SATA III 3D TLC Internal SSD | $59.99 | Amazon |
| Motherboard | ASUS TUF Z390-Plus Gaming (Wi-Fi) LGA 1151 | $179.99 | Amazon |
| RAM | G.SKILL Ripjaws V Series 8GB DDR4 | $39.99 | Amazon |
| Case with PSU | RAIDMAX Vortex V4 ATX-404WUP Mid Tower Case with 450W PSU | $59.99 | Newegg |
Rather than going into the specifics of setting up VMs for each of the solutions I am using, I am going to document perhaps the most important implementation, pass-through GPU configuration
Passing Through GPU on Proxmox UI to an Ubuntu VM:
Before proceeding with configuring pass-through, you must make sure IOMMU is supported and configured within the bios of your system.
Enabling IOMMU in BIOS/UEFI
- Accessing BIOS/UEFI:
- Restart your computer and access the BIOS/UEFI settings. Press a key during the boot process (common keys include Del, F2, F10, or Esc, depending on your motherboard).
- Locate Virtualization or IOMMU Settings:
- Navigate to find options related to virtualization or IOMMU. Look for terms like "IOMMU," "VT-d," or "AMD-Vi" (for AMD processors). These settings may be in different sections based on your motherboard.
- Enable IOMMU:
- Set the option for IOMMU to "Enabled." This allows the system to efficiently manage memory addresses for devices.
- Save and Exit:
- Save changes and exit the BIOS/UEFI. Select the appropriate option, often labeled as "Save & Exit" or similar.
- Verify IOMMU Status:
- After rebooting, verify IOMMU status by checking system logs or using tools like
dmesg | grep -e IOMMUin a terminal. Ensure the output indicates active IOMMU support.
- After rebooting, verify IOMMU status by checking system logs or using tools like
Enabling IOMMU is crucial for GPU pass-through to virtual machines, improving performance and enabling features like gaming or graphics-intensive applications. Refer to your motherboard's manual for specific instructions. If you can't achieve this step, you can't pass-through the GPU with your setup.
Assuming that you are good to go, let's continue with configuring the Host OS and Host VM appropriately.
Identifying GPU using lspci:
The first thing you are going to wan to do is identify the GPU hardware information, I personally followed the guide on Prommos's own wiki, but it took some trial and error to finally get it all set up.
- Identifying GPU using
lspcion Proxmox Host:- Log in to the Proxmox host machine.
- Open a terminal.
- Look for the line corresponding to your GPU. Note down the PCI address (e.g., 01:00.0).
Run the following command:
lspci
After identifying the GPU on the host, proceed with assigning it to the VM within the Proxmox web interface.
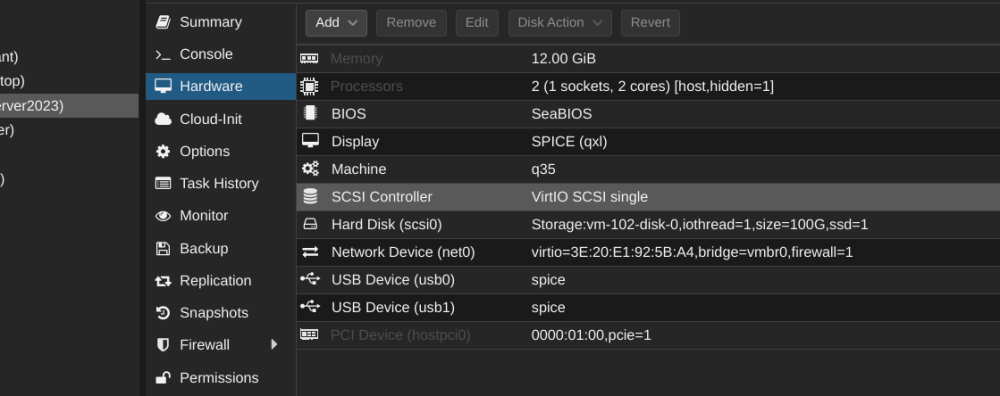
- Assigning the GPU to the and Ubuntu VM:
- It is assumed you have an Ubuntu Server VM configured at this point.
- Navigate to the VM and select the "Hardware" option.
- Click on the "Add" button and choose "PCI Device."
- Enter the PCI address of the GPU you noted down e.g.,
0000:01:00.0. - Save the changes.
- Grub Edits for Ubuntu VM:
- SSH into your Ubuntu VM you are configuring GPU passthrough for.
- Reboot the VM.
Save the file and update Grub:
sudo update-grub
Add the following lines to the GRUB_CMDLINE_LINUX section:
GRUB_CMDLINE_LINUX="iommu=pt intel_iommu=on"
Edit the Grub configuration file:
sudo nano /etc/default/grub
Conclusion:
Proxmox, coupled with high-quality components, unlocks a world of possibilities for virtualization enthusiasts. This guide provides a foundation for building a basic Proxmox system, and hopefully the specifics regarding GPU pass-through help some others on their journey. I found the hardware noted in this article more than acceptable on achieving my goals (hosting a Minecraft server, home assistant OS, an Ubuntu server with various video trans-coding requirements),but you may want to understand the requirements of what you are trying to achieve before placing any orders, as they say, YMMV.
Note: Prices listed are from Newegg as of late 2019 and may have changed.